Variables and a multi-level nav structure

Hello!

I’ve read the articles about having too many variables, or duplicate/old variables but I think my issue is a little different.

I’m building a multi-level nav, which has parents and children and sub-children. Currently, I have each button (nav item) handling it’s own State, because I need to be able to control each button separately based on what gets selected.

The issue: There are a lot of variables to switch per selection. Breadcrumbs, Page Titles, Descriptions, Page Views, the nav item itself getting selected and simultaneously setting all others to default.

My question is, is there an easier way to do mass variable state switches for the nav? If I add a new nav item, or include a new element that requires a variable, I then have to go into each nav item’s interactions and add that to the list. As you can imagine with 20+ nav items this gets tiring and frustrating. :stuck_out_tongue:

It would be great to have these all be part of a larger group where the rule is only one can be selected at a time, but I doubt that exists. *It also makes keeping a parent staying selected an issue as well.

Has anyone run into this yet? Any ideas? :slight_smile:

Hi @Derek_Roche, glad you asked this question.

To do this, we need to understand the actual variables we need to accomplish this multi-level navigation you’re doing. In your case, we have these variables:

Understing Variable Elements

  1. The selected navigation option (regardless if they were 5 or 20, they are all called navigation options).
  2. Page title.
  3. Page breadcrumbs.
  4. Page description.
  5. Rectangle color (you didn’t mention this, but I added it to explain other options you can do).

Working Methodology

I will explain the working process, then mention the steps:

  1. We will set the desired variables in our “local variables” list.
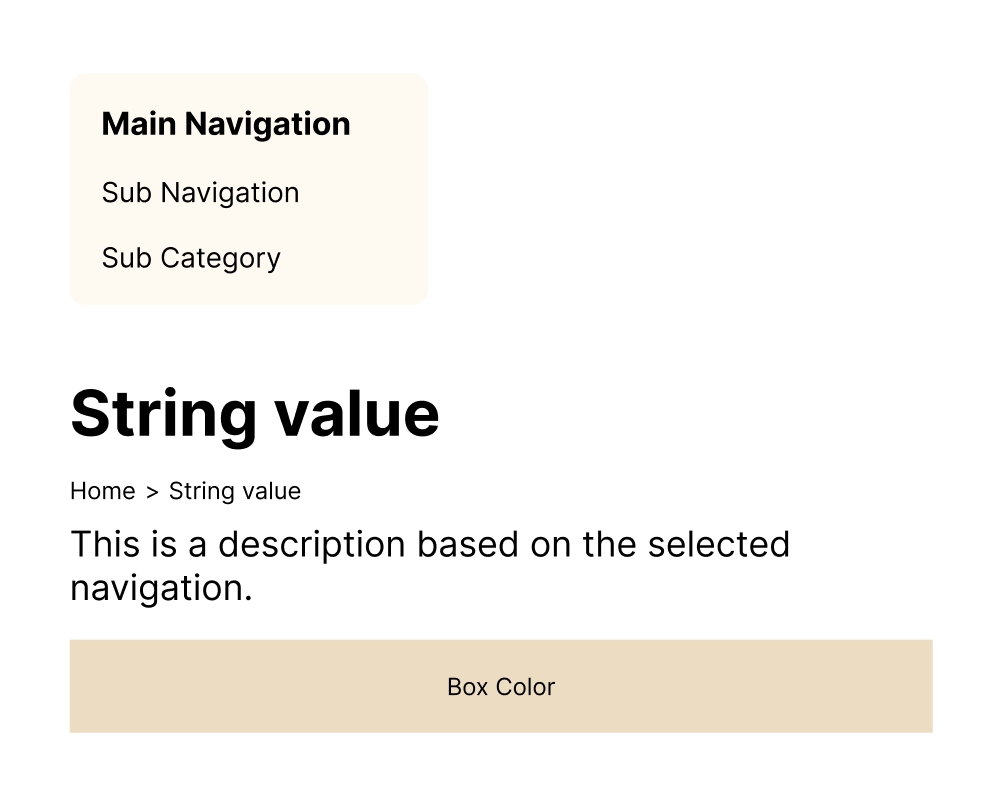
  2. We will create the navigation bar or navigation buttons, and create a title, breadcrumbs, description, and a colored box.
  3. We will connect these elements with their related variables.
  4. We will create interactions for each navigation button, to make them change all the previous elements based on the selected navigation button.

Working Process (steps)

To do this, follow these steps:

  1. Create a frame and create the navigation bar as you want, then create the following (attached sample image):
  • “Project Title” text.
  • “Selected Breadcrumbs” text.
  • “Description” text.
  • A colored rectangle.

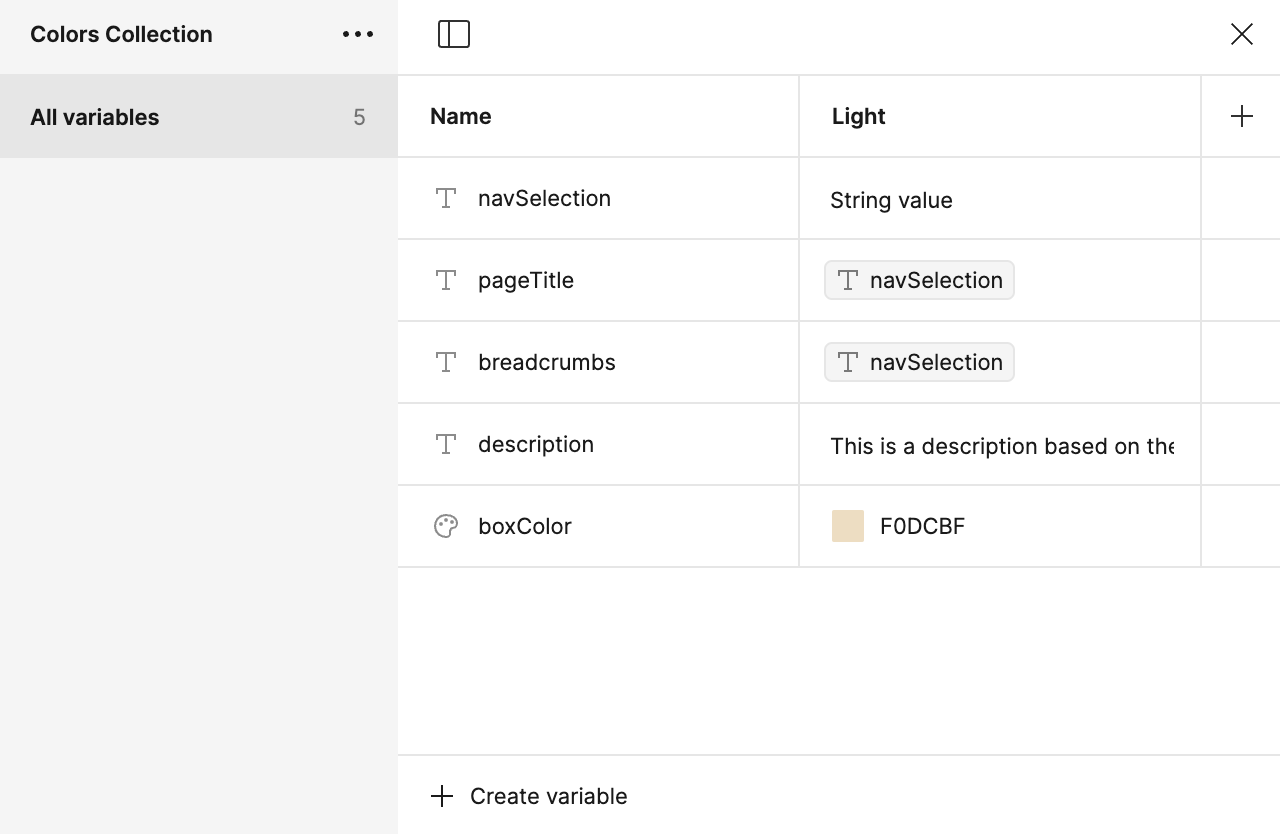
  1. Create the following variables on your “local variables” list:
  • String variable: “navSelection”.
  • String variable: “pageTitle”.
  • String variable: “breadcrumbs”.
  • String variable: “description”.
  • Color variable “boxColor”: #F0DCBF (or any other color, it doesn’t matter).
  1. Connect the “navSelection” to “projectTitle” and “breadcrumbs” variables as shown in the attached image. You can do this by hovering on the variable box, then a hexagonal button with dot inside it will appear, click on it and choose “navSelection” option.

  1. Go back to the canvas, and connect the following with its related variable:
  • Connect “Project Title” text with “projectTitle” variable.
  • Connect “Breadcrumbs” text with “breadcrumbs” variable.
  • Connect “Description” text with “description” variable.
  • Connect the rectangle color with the “boxColor” variable.

To connect text with string variables, follow this link.
To connect colors with color variables, follow this link.

Creating Interactions

Now the final steps. We want to change these variables when clicking on each navigation button, and act differently based on what’ the selected navigation. To do this, follow these steps:

  1. Open the Prototype view, from the right panel.
  2. Go to the first navigation button, and click on it. Add “click” interaction to it by clicking “+” form the right side panel.
  3. Choose “click”, then select on the action field and choose “Set Variable” option.
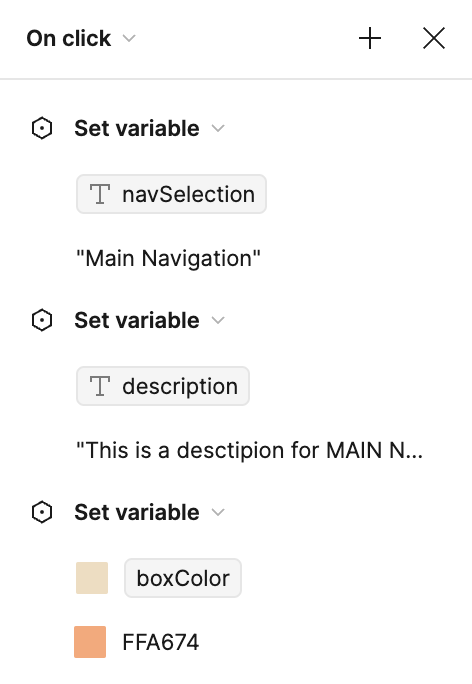
  4. Do the following (attached sample image):
  • After choosing “Set Variable”, choose “navSelection” and set its value to the desired text (in your case, choose the same name of the navigation).
  • Create new action by clicking on the “+” button on the top-left side of the box, also choose “set variable”, the choose “description” change it’s value to any text you want.
  • Create a new set variable action, choose boxColor, and set its value to something else.

  1. Do the same interaction with all other navigations, and don’t forget to change “breadcrumbs”, “description”, and “boxColor” values. Also, you can click on the interaction arrow, copy and paste it for other navigation buttons. This will reduce working time.

You’re All Set!

And that’s it, you’re all set. You can now play the prototype, and see how the elements change based on which navigation button you clicked on. you can check this sample file and duplicated it to see how it’s built.

Thanks

1 Like

This is very detailed thank you! The one part I’m missing, is that if you had 10-20 nav items - each with 3 states (default, hover, selected), is there an easy way to manage the states for each nav item when an other is clicked?

Scenario:
Category > Nav Item (is selected)

Another Category > Sub Category > Nav Item - When I click this, everything else needs to return to default state, and set this path to selected state.

I have this working now by setting each category and nav item individually on every “onClick” action. Is there a way to “group” or make this easier?

*Apologies if my original question wasn’t accurate