Solved

Hey! How did I create this unfilled loop?

  • December 27, 2021
  • 7 replies
  • 3221 views

Jeff16

Hello! I know that Figma approaches complex shapes differently than some other apps when deciding where to apply a fill color. If I want to draw a shape with a closed, unfilled loop, I generally need either to flatten it to a vector network and toggle the visibility of the fill (which inserts new points on the shape and makes it harder to edit after that) or draw the shape in sections so Figma doesn’t recognize any enclosed spaces.

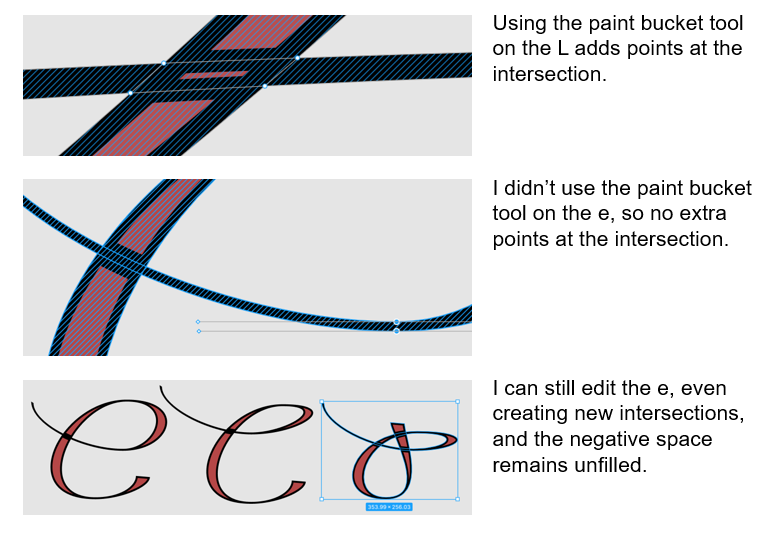
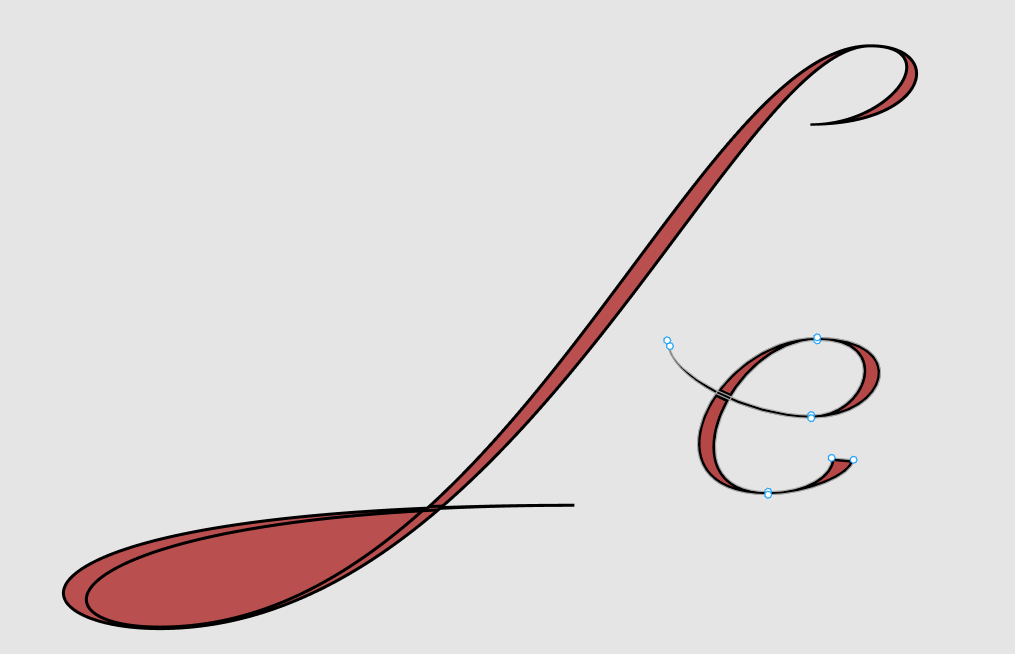
However, tonight I discovered that somehow I’ve created a shape that behaves the way I’d like it to. See the picture below. I can edit the “e” and the loop doesn’t fill when it’s closed. However, the “L” next door behaves the way I’m used to seeing it.

Any idea how I can consistently achieve this in the future?

Thanks,
Jeff

Best answer by Gleb

Ohh, why did they make it so hard… Ok, another method that should probably work: remove the fill, then change the shape so that there is no overlap (should be easy to do with this one), then add fill with bucket tool, then change the shape again.

View original
This topic has been closed for comments

7 replies

Gleb
  • Power Member
  • 4706 replies
  • December 27, 2021

Use the Paint Bucket tool.

Paint Bucket tool in the top Figma toolbar


Jeff16
  • Author
  • 3 replies
  • December 27, 2021

Thanks … yes, I know about that. If I do that with my L, I can toggle the fill in the loop on and off. But doing that adds points at the intersection, which will make it harder for me to keep the strokes smooth if I edit the shape.

Somehow, the loop in the e is staying unfilled without using the paint bucket tool, so there are no new points at the intersection. This means I can still edit the shape, even adding new intersections, and the negative space remains unfilled.

This is my first post so it’s not letting me upload a video, but here’s an illustration that maybe will make it clearer:

That’s what I’m hoping to replicate. The problem is, I created both the L and the e in the same file, using basically the same method, so I’m not sure what I might have done differently to get the different behavior.

Jeff


Gleb
  • Power Member
  • 4706 replies
  • December 27, 2021

Jeff16
  • Author
  • 3 replies
  • December 28, 2021

Thanks, Gleb. Is there a way to make that work without flattening the shape first? It seems like the outcome is the same as using the paint bucket.


Gleb
  • Power Member
  • 4706 replies
  • Answer
  • December 28, 2021

Ohh, why did they make it so hard… Ok, another method that should probably work: remove the fill, then change the shape so that there is no overlap (should be easy to do with this one), then add fill with bucket tool, then change the shape again.


Jeff16
  • Author
  • 3 replies
  • December 28, 2021

That works! Thank you!


  • 0 replies
  • January 27, 2022

This topic was automatically closed 30 days after the last reply. New replies are no longer allowed.


Cookie policy

We use cookies to enhance and personalize your experience. If you accept you agree to our full cookie policy. Learn more about our cookies.

 
Cookie settings