I work in Figma every day but rarely try out new plugins. So I took last week to try over 100 of the top ones to see which are actually worth incorporating into my design flow. I found 21 really awesome plugins and grouped them into different “stacks”. Thought some people here might find the results helpful. Enjoy!
Content Stack
Every design project needs content. Whether images, dummy text, or icons, you need content to make high-fidelity designs. The problem is, finding and adding high-quality content is time-consuming. The plugins below are essential for quickly adding a wide range of content types to your designs.
Content Reel
Content Reel is a one-stop shop for most of your content needs. It supports a huge library with specific categories of content to populate text layers, frames, or shapes. Choose from 100+ types of dummy text (e.g. lorem ipsum, names, dates), 100+ types of image fills (e.g. avatars, logos, cities), and a few icon libraries by Microsoft. If you can’t find what you’re looking for, you can also create an account and import your own text or image category.
Example use case: Bulk populate text layers in a table with realistic data.
- Open Content Reel
- Select the layers you would like to populate (e.g. text layer)
- Click the desired category until you find a selection you like
Pro tip: Select the star next to the categories you use often to “favorite” them. Then find all your favorite categories under the “Home” tab for quick reference.

Cost: Free! Must create an account to import personal content.
Creators: @MicrosoftDesign, @aistrope, @gavriloff, @wendyhsu
Install Content Reel
Google Sheet Sync
This plugin lets you sync Google Sheets with your Figma file to bulk populate text and image layers. This is a game-changer for any designs that need a large amount of data. Especially if that data needs to be up-to-date. Instead of populating every text or image layer 1-by-1, every layer automatically populates at once.
Example use case: Populate multiple data points for three cards.
- In Google Sheets, create a new sheet with all the content organized under labels (e.g. “Title”). Each row will later map to one component.
- In Figma, create your components and name the layers you need to be populated with a “#” at the beginning (e.g. “#Title”). Do not use any periods in your layer name (".").
- In Google Sheets, set the Share link settings to “anyone with the link” and copy the URL.
- In Figma, open Google Sheet Sync and Paste the Share link. Then select “Fetch & Sync”.
Pro tip: Add images by pasting their web URL into the table cell. This only works if your image layer is a shape (not a Frame).


Cost: Free! Must have a Google account.
Creators: @DavidWilliames
Install Google Sheet Sync
Blush
Blush supports a large library of well-designed pre-built illustrations. It also makes it easy to customize illustrations to match your brand. You can add illustrations created in Blush to your file as a PNG or SVG.
Example use case: Create a unique character by selecting from a number of different properties.
- Open Blush
- Select an illustration set & type
- Select your desired hair color, skin color, and body parts

Cost: Free! Must upgrade to Pro to add illustrations as SVG.
Creators: @blushdesignapp
Install Blush
Unsplash
Unsplash is one of the most downloaded Figma plugins for a reason. It’s the best plugin for finding and adding high-quality photos to your designs. It is perfect for when you need to find specific, or particularly beautiful images.
Example use case: Inserting a specific image into a product card.
- Open Unsplash
- Select the layer (frame or shape) you want to populate
- Browse or search the library and select your desired image
Pro tip: Select multiple layers, then choose a category in the “Presets” tab to populate each layer with a different image.

Cost: Free!
Creators: @kirillz, @liam
Install Unsplash
Iconify
Iconify feels clunky, but it’s the best (free) all-in-one icon plugin. It has 100+ icons sets from popular libraries like Material Design and Font Awesome. Plus, each icon set is searchable and has vector support.
Example use case: Add a specific icon to your file from a certain icon set.
- Open Iconify
- Select your desired icon set
- Browse or search for the icon you need
- Drag and drop the icon into your design file

Cost: Free!
Creators: @cyberalien
Install Iconify
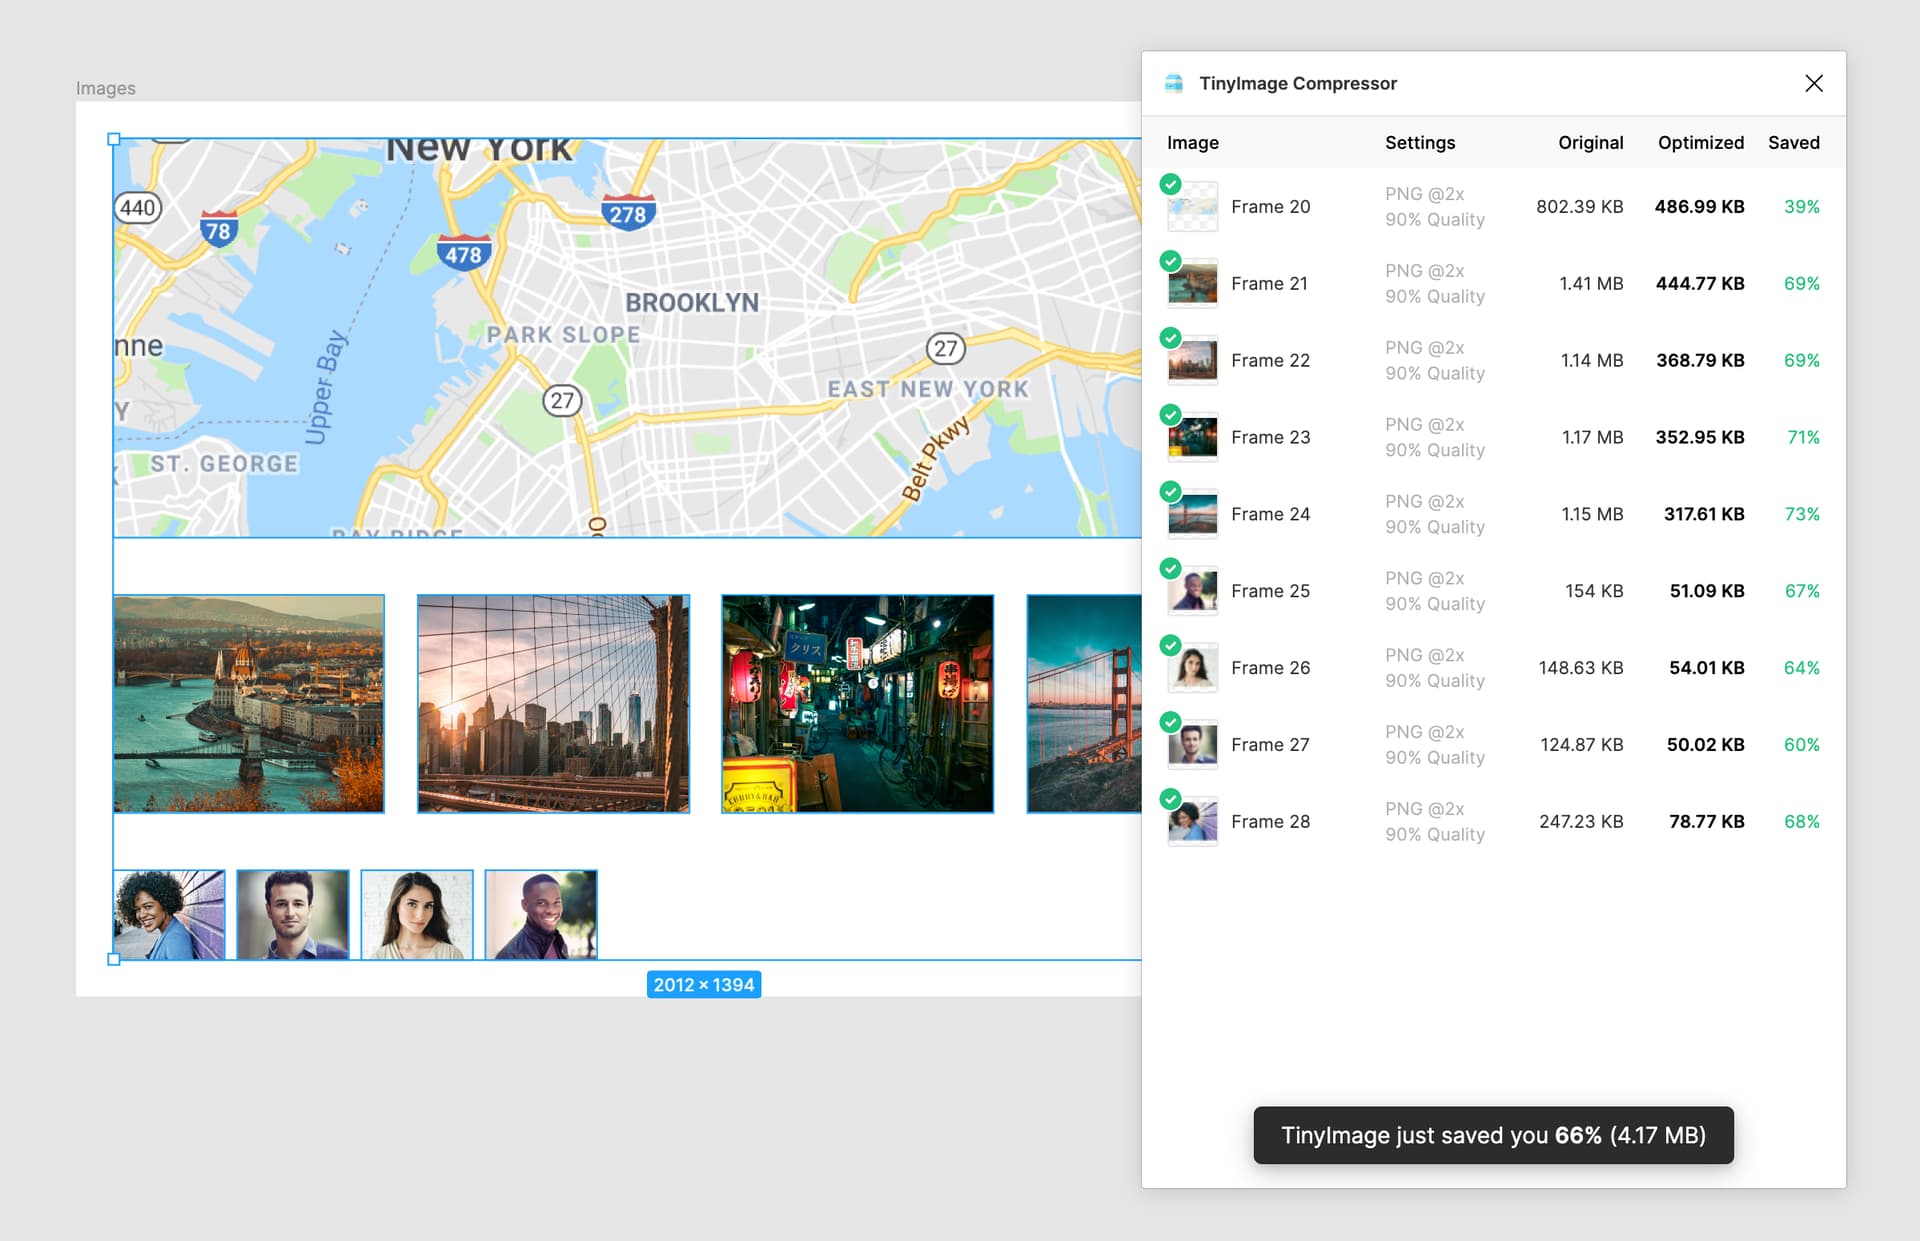
TinyImage Compressor
Once you have your content, you’ll need to export it for development. Exporting assets from Figma can result in large files that take up a lot of space and slow down performance. Instead, use TinyImage Compressor to reduce the size of your exports. It supports compression for JPG, PNG, SVG, WebP, GIF, WebM, AVIF, and PDF file types. It’s the best way to reduce asset size and keep the original quality.
Example use case: Compress large images
- Make images exportable (select “+” next to “Export” in the Design Panel)
- Open TinyImage compressor
- Choose items you want to compress and select “compress”
Cost: Paid subscription after free trial (15 compressed exports).
Creators: @figmatic
Install TinyImage Compressor
Perfectionist Stack
Keeping your designs pixel perfect and up-to-date not only makes you look like a real pro but makes maintaining your design file and communicating with your team much easier. The larger the project, the more important, and difficult, this becomes. Below are the best Figma plugins to help you and your team catch errors and make bulk updates.
Style Organizer
Style Organizer allows you to see every color and text layer on a page, identify if it’s linked to a style or not, and make bulk updates. It even recognizes when “unlinked” layers match a saved style and will “merge” them all to apply the correct style. This is a huge time saver when you need to clean up a file with a lot of missing styles.
Example use case: Find all missing color styles and “merge” them with the correct style.
- Open Style Organizer
- Locate missing styles (“unlinked”)
- Select “Merge” icon or make edit in Design Panel

Cost: Free!
Creators: @1535
Install Style Organizer
Spell Inspector
After testing the top 4 spellcheck plugins, Spell Inspector was the clear winner! It searches an entire Figma page and shows all the misspelled words in a table format for easy scanning. This is crucial as you are bound to have some gibberish placeholder text. Being able to scan and ignore them is a big time saver.
Example use case: Finding and correcting all spelling errors
- Open Spell inspector
- Navigate to the “real” misspelled word by clicking on it in the table
- Select the correct spelling option to replace the word

Cost: Free!
Creators: @logicwind
Install Spell Inspector
Icon Resizer
I’m not sure why. I’m not sure how. But I’ve seen too many design files using mismatched icon sizes. If this sounds familiar, you need this plugin! Rather than manually resizing every icon’s frame and vector shape, then center aligning everything. Use Icon Resizer to bulk resize all your icons (frame AND vector).
Example use case: Resize a set of icons whose frames and vectors are all different sizes.
- Open Icon Resizer
- Select all icons
- Set “Max Height/Width” and “Icon Box Size”, then select “Run”
Pro tip: Make the max width/height ~6px less than the box size to allow for a little internal padding.
Cost: Free!
Creators: @arbel
Install Icon Resizer
Similayer
Similayer allows you to auto-select every layer on a frame that is “similar” to your original selection. This is a huge time saver when you need to select 10+ layers. Especially if those layers are nested inside of groups or frames. Use it to select layers with similar text, fill, stroke, size, position, etc. It can even be used with multiple properties (e.g. similar fill AND stroke). My favorite way to use Similayer is to select all instances of a master component and make bulk overrides!
Example use case: Select every instance of a certain icon to swap it with another icon.
- Open Similayer
- Select a single layer
- Choose one or multiple properties this layer has in common with the other layers you would like to select.
- Click “Select layers” and make an edit(s) to selected layers
Pro tip: Use this plugin with Content Reel to bulk populate many similar layers.

Cost: Free!
Creators: @DavidWilliames
Install Similayer
Branding Stack
There comes a time for every website or product when branding needs a refresh or update. While this is often a fun moment for exploration and creativity, it can also be a daunting task. Finding the right styles and making all the updates is difficult and time-consuming. But with the plugins below it doesn’t have to be. Use them to auto-generate the perfect color palette and update your text and color styles in bulk.
Batch Styler
Customizing every style to match your branding is tedious. Especially when you’re starting a new project or customizing a UI kit. That’s where Batch Styler comes in. Rather than editing styles 1-by-1, this plugin allows you to edit every aspect of your text or color styles in bulk.
Example use case: Update the font family for every text style.
- Open Batch Styler
- Select every text style (hold “Shift” to select multiple items)
- Update the font family and select “Update styles”
Pro tip: Use the “find & replace” inputs to bulk update style names.

Cost: Free!
Creators: @six7
Install Batch Styler
Image Palette
Image Palette allows you to pull color inspiration from an image. It uses a fancy algorithm to capture the 5 most prominent colors of an image. This is a great way to discover new color combinations you might not have thought of.
Example use case: Create a color palette from an image
- Select the image
- Open Image Palette

Cost: Free!
Creators: @mattdesl
Install Image Palette
Tailwind Color Generator
Generating a well-balanced range of colors can be time-consuming. It’s both a science and an art form that is surprisingly difficult to get just right. Luckily the Tailwind Color Generator can do most of the heavy lifting. From one base color, the plugin generates 10 balanced styles (1 base + 4 tints + 4 shades). The new colors can then be found neatly organized in the Style Panel.
Example use case: Create a full color range based on one default color.
- Open Tailwind Color Generator
- Select layer with new default color
- Add “Base Name” and create a color set
Pro tip: Use Image Palette (above) to find base colors.

Cost: Free!
Creators: @picapipe_com
Install Tailwind Color Generator
Accessibility Stack
There’s nothing less user-friendly than your users not being able to see your designs. Use these plugins to catch accessibility errors early and set up guidelines to follow as your designs scale. This ensures users understand and can navigate through your product with ease.
Contrast
After testing the top 3 color accessibility plugins, Contrast is the clear winner. It’s easy to use and super fast at flagging contrast issues. You can test contrast ratios (from WCAG) for a single layer, or scan an entire page to spot issues. It even uses “smart sampling” to check the contrast with elements using a gradient or image.
Example use case: Test the contrast ratios for each of your text layers.
- Open Contrast
- Select the layer you want to test
- Edit layer or background until it passes all ratio tests
Pro tip: Keep all black text layers above 65% opacity.

Cost: Free!
Creators: @maark
Install Contrast
Color Blind
This plugin allows you to create views for 8 types of color vision deficiencies. Each view represents how people with color blindness experience your website or product. It then flags where they may have trouble. You can then make updates to the color palette or add extra signals (e.g. icons, text) to reduce confusion.
Example use case: Test accessibility by creating views for all 8 types of color vision deficiencies.
- Select layer (entire screen or component)
- Open Color Blind
- Choose one or multiple types of vision deficiencies and select “Create views”
Pro Tip: Test the contrast ratios for each view you create using the Contrast plugin.

Cost: Free!
Creators: @sammdec
Install Color Blind
Showoff Stack
Use this stack of plugins to go the extra mile and bring your designs to life. Create animations or vector shapes that you otherwise would only be able to create in a separate tool (e.g. Adobe). Or generate complex effects and sharp-looking mockups.
Figmotion
This plugin takes things to a whole 'nother level! It allows you to create advanced animations to show specific interactions. Instead of using a separate tool like Adobe After Effects, with Figmotion you can create an animation right in Figma. It’s also easy to use (even for novice animators). Render animations as mp4, gif, webm, or export as CSS or JSON.
Example use case: Create an animation for a loading screen.
- Open Figmotion
- Select the frame you want to animate
- Configure the keyframes (watch this video to learn how)
- Render or export video
Pro tip: Insert gif into your prototype to show where this behavior can be found. During “presentation” the gif will autoplay.

Cost: Free!
Creators: @liam
Install Figmotion
Image Tracer
Image Tracer allows you to “trace” an image and generate an exact copy as a vector shape. This is perfect for removing a background, editing the shape/color, or export as an SVG. I often use this when creating illustrations or modifying a logo or icon.
Example use case: Create an editable vector shape from a PNG.
- Select image
- Open Image Tracer
- Select “Place traced vector”
- Edit vector
Pro tip: Use images with a solid dark shape on a light background.

Cost: Free!
Creators: @DavidWilliames
Install Image tracer
Morph
Morph allows you to create interesting effects to give your designs a little extra “oomph”. Each effect is pre-built and ready to use. Or you can tweak the properties in the Design Panel to get it just right.
Example use case: Create interesting effects for a card background.
- Open Morph
- Select a shape or vector (not frame)
- Select and configure the effect you want
- Preview effect and select “apply”

Cost: Free!
Creators: @millons098
Install Morph
Clay Mockups 3D
Place designs in a device mockup to show them in marketing websites, ads, or portfolios. Clay mockups 3D not only allows you to insert your design into a device. It allows you to customize the device angle, rotation, and color.
Example use case: Insert design into a customized device mockup
- Select image
- Open Clay Mockups 3D
- Customize the device type, orientation, and color
- Select “Save as Image”
Pro tip: Make your frame size 1200x800 and add a little extra internal padding to the top.

Cost: Free!
Creators: @hamishMW
Install Clay Mockups 3D
Wireframe Stack
Wireframe plugins make it easy to use Figma for both low and high-fidelity designs. That way all your design work is in one place and easy to reference vs in separate tools. The plugins below speed up the early design phase work with drag/drop layouts and automatic arrow connectors.
Autoflow
Autoflow is a quick and easy way to add connecting arrows between frames to illustrate a user flow. The best part? When you move the frames, the arrows automatically update to maintain the connection. You never have to manually move or edit an arrow again.
Example use case: Create and edit a user flow
- Open Autoflow
- Configure line color, stroke, and terminal settings
- Connect two frames by selecting both of them while holding “Shift”
Pro tip: Re-open Autoflow to edit frame location. When Autoflow is open, you can change frame location and the arrows will update automatically.

Cost: Free!
Creators: @davidyitong
Install Autoflow
Wireframe
Wireframe is a great plugin for mocking up a design idea right in Figma. It allows you to add a wide range of common layouts that are uniformly styled. Using these layouts is a great way to move fast and not get bogged down in the details.
Example use case: Create a wireframe
- Open Wireframe
- Select layout
- Resize layout on frame

Cost: Free!
Creators: @HexorialStudio, @imdeepjoshi, @itsmnthn
Install Wireframe
ps. I write articles, like this, about Figma related topics from time to time. Subscribe to my newsletter to have them sent directly to your inbox.
 . Thanks for all these suggestions